Most home cooks never try, because the internet has spent years convincing them they need an electric gadget, a laser-guided jig, or the steady hands of a surgeon. You need none of it. You need one stone, some water, and about ten minutes a month. The pull-through sharpener in your drawer is, meanwhile, actively making things worse, grinding your edge away at a fixed, aggressive angle it never lets you correct.
This guide walks you through the whole thing: what a sharp edge actually is, which stone to buy, how to hold the angle without a jig, and how to feel the one piece of feedback – the burr – that tells you it is working. By the end you will be able to take the dullest knife in your kitchen and make it genuinely, alarmingly sharp. Let us fix that drawer full of butter knives.
What a Sharp Edge Actually Is
Strip away the mystique and a knife edge is almost disappointingly simple: two polished planes of steel that meet at a line. How cleanly and how finely they meet is the entire definition of sharp. A dull knife is not missing anything; its edge has just gone rounded and ragged, folded over and worn down by months of contact with cutting boards, bones and the inside of your dishwasher. Under magnification a sharp edge looks like a crisp mountain ridge, and a dull one looks like a trampled hedge.
This matters because it tells you what sharpening is: not adding anything, but grinding those two planes back until they meet at a clean line again. Kenji Lopez-Alt makes the reassuring point that most home knives are not damaged, merely neglected, and neglect is reversible in minutes. You are not repairing your knife so much as reminding it what it used to be.
A whetstone does this by abrasion. Draw the steel across a fine grit surface and you shave away a few microns at a time, reshaping the bevel until the ragged edge is gone and a new, keen one takes its place. Everything else in this guide – the soaking, the angle, the burr – is simply how you control that one process precisely enough to get a razor instead of a mess.
Why a Whetstone Beats a Pull-Through
If you own one of those V-shaped pull-through sharpeners, I have some bad news about the grinding noise it makes. That sound is tungsten carbide tearing metal off your edge at a fixed, steep angle you have no say in. It will make a truly dull knife cut again, briefly, but it does it by removing far more steel than necessary and leaving a coarse, toothy edge that dulls fast. Use one for a few years and you can watch your knife lose height, a fraction of a millimetre at a time.
A whetstone is the opposite philosophy. It is slower, and the slowness is the entire point: you choose the angle, you choose how fine an edge to polish, and you remove only the metal you actually need to. Control, not speed, is what makes a whetstone edge both sharper and longer-lasting. It is cheaper in the long run, too, because one stone will outlive a drawer’s worth of disposable gadgets.
You do not need anything exotic to start. A basic combination stone with a coarse and a fine side is what most cooks use for life, and the King KW65 is the classic: a 1000-grit side to set the edge, a 6000-grit side to polish it, and a plastic base so it does not skate across the counter.

KING KW65 1000/6000 Grit Combination Whetstone with Plastic Base
- 1000-grit side reshapes the edge; 6000-grit side polishes it to a bright, keen finish
- The no-frills Japanese stone that generations of cooks have quietly relied on
- Sits in a sturdy plastic base so it stays put while you work

Decoding Grit: 1000, 6000, and When You Need 400
Grit numbers describe how coarse the abrasive is: the lower the number, the more aggressive the cut. For everyday sharpening, a 1000/6000 combination covers you completely. The 1000 side does the real work of forming a fresh edge; the 6000 side refines it to the point where the knife falls through a tomato under its own weight. If you only ever buy one stone, buy that pairing.
There is one situation where you want to go coarser. If a knife is genuinely damaged – a chip, a rolled tip, an edge so far gone that 1000 grit would take twenty minutes – a 400-grit stone gets you there far faster, and then you refine up through the finer grits. Think of 400 as a repair tool and 1000/6000 as maintenance; most kitchens need the second far more than the first.
For anyone who wants the full range in one purchase, Sharp Pebble’s extra-large three-grit set bundles 400, 1000 and 6000 with a bamboo base and, crucially, a flattening stone – more on why that matters shortly.
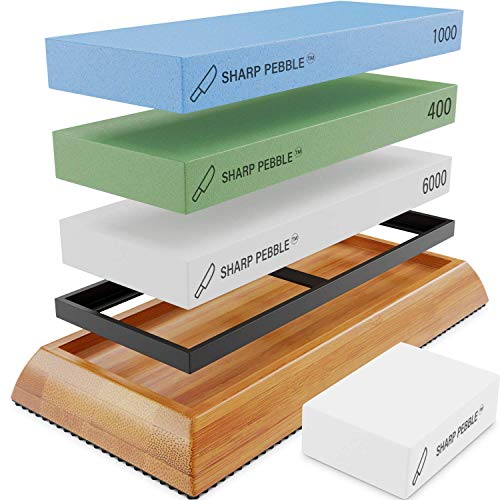
Sharp Pebble 400/1000/6000 Extra-Large Whetstone Kit with Flattening Stone
- Three grits – 400 to repair, 1000 to sharpen, 6000 to polish – in one oversized set
- Larger 8 by 2.75 inch stones give long chef’s knives more room to travel
- Includes a flattening stone to keep the surfaces true over time
Getting the Angle Right (Without a Jig)
The single thing that scares people off whetstones is the angle, and it is genuinely the part that takes practice. Most Western chef’s knives want somewhere around fifteen to twenty degrees per side. You do not need a protractor. The trick every cook learns is to lay the blade flat on the stone, then lift the spine by about the thickness of two stacked coins. That is close enough to twenty degrees to be right, and holding it consistently matters far more than hitting an exact number.
Consistency is the whole game. A steady, slightly-wrong angle will out-sharpen a wandering, theoretically-perfect one every time, because a wandering angle just rounds the edge back off as you go. If your hands are new to it, a clip-on angle guide takes the anxiety out of those first few sessions and lets you feel what the correct angle should be, after which you can retire it. Sharp Pebble’s beginner kit builds exactly that in, alongside a 1000/6000 stone and, sensibly, written instructions.

Sharp Pebble Premium 1000/6000 Whetstone Kit with Angle Guide
- Clip-on angle guide holds the blade steady while you learn the motion
- Dual 1000/6000 grit stone on a non-slip bamboo base, plus written instructions
- A forgiving, all-in-one starting point that removes the guesswork
If you would rather watch the motion before you try it, Kenji’s whetstone walkthrough is ten honest minutes of exactly this.
How to Sharpen, Step by Step
Here is the whole procedure. Read it once, then do it – it is far less fussy in your hands than it looks on the page.
- Soak the stone for about ten minutes, until the bubbles stop rising. A dry stone clogs and scratches; a saturated one glides. (King and Sharp Pebble water stones both want soaking; check your stone’s instructions.)
- Set it on something stable – the included base, or a damp towel on the counter so it cannot slide.
- Find your angle: blade flat, then lift the spine two coins’ worth, roughly twenty degrees.
- Work the coarse side first. Draw the edge across the stone from heel to tip in smooth, even passes, keeping that angle. Cover the whole length of the blade, including the curve up to the tip.
- Sharpen until you feel a burr. Run a fingertip gently down and away from the edge on the opposite side; when you feel a faint wire-like catch along the entire length, that side is done.
- Flip and repeat on the other side until you raise a burr the other way.
- Move to the fine grit and take a few light passes per side to polish the edge and wear the burr away.
- Rinse, dry, and test on a sheet of paper or a ripe tomato.
The first knife will take you fifteen nervous minutes. The tenth will take you five.
Feeling for the Burr – the Feedback Everyone Ignores
If you take one idea from this guide, take this one: the burr is how the knife talks to you. A burr, sometimes called a wire edge, is the tiny lip of metal that forms on the far side of the edge once you have ground the first side all the way to the apex. It is physical proof that you have actually reached the edge, rather than politely sanding the shoulder of the bevel and achieving nothing.
You find it by touch, not sight. Wipe the blade, then draw a fingertip gently away from the edge – never along it – on the side opposite the one you were sharpening. A finished side feels like a faint, continuous catch running the whole length of the blade. No burr means you are not there yet, full stop – keep going. A burr on only part of the blade means that stretch of edge needs more work.
This is the feedback loop that pull-through sharpeners hide from you and expensive gadgets pretend you do not need. It is also why sharpening is a skill rather than a chore: once you can feel a burr, you can sharpen anything with total confidence – your knives, your flatmate’s terrible knives, the sad serrated thing at the back of the drawer.
Flattening, Honing, and the Myths Worth Killing
Two bits of housekeeping and one common confusion, and then you are free. First, flattening: every water stone wears into a shallow dish over time, and a dished stone quietly puts a curve into your edge. A flattening stone, or a dedicated lapping plate, rubbed over the surface for a minute brings it back to true. That is the reason the three-grit Sharp Pebble set includes one, and it is worth doing every few sessions.
Second, honing is not sharpening – the myth that trips up almost everyone. That steel rod that came with your knife block does not remove metal or create a new edge; it just realigns an edge that has folded slightly to one side during use. Hone often, between sharpenings, to keep a good edge straight; sharpen on a stone occasionally, when honing no longer brings the bite back. Different jobs, different tools.
Finally, ignore anyone who insists you need a two-hundred-dollar splash-and-go stone to begin. You do not. Buy a knife worth the effort – our Victorinox Fibrox versus Wusthof Classic comparison covers two that take an edge beautifully – pair it with a board that will not chew that edge, and put a real edge on it with a twenty-dollar stone. The stone is the cheapest upgrade in your entire kitchen.
The Ten-Minute Habit
None of this is difficult, which is precisely what the gadget aisle would rather you never found out. A sharp knife is not a professional birthright or a matter of expensive kit; it is one stone, some water, and ten minutes you will genuinely come to enjoy once the fear is gone. Learn to feel the burr and you have learned the whole craft – everything after that is just repetition.
So buy the stone, fill a bowl with water, and start with the worst knife you own, the one you have already half given up on. If you are just beginning, the Sharp Pebble beginner kit and its angle guide will get you there with the least anxiety; if you would rather learn on the classic and never look back, the King KW65 is the stone cooks have trusted for decades. Either way, do it once a month and you will spend the rest of your life quietly baffled that you ever tolerated a dull knife – and, like my mother at that dinner, everyone who borrows your kitchen will notice, whether or not they can say why.
(And if the knives themselves are the weak link, our best knife sets roundup will find you steel worth the stone.)